17.2.12

Update: Room Redecoration

Hi, everyone! I recently finished painting my bed side table. I did the same things as the bookcase. First, I sanded it down, to remove the varnish. Second, I gave it 3 coats of paint, waited for it to dry very well and gave it a quick sand to get a smooth surface. Finally, I sanded the areas I wanted it to look distressed, in this case, the edges and on top of the intricate designs. I did all this in one day. I had already painted the drawers the day before, but I think it's possible to paint it one day. Because the paint I used (details below) dries very fast. Here is the before and after picture:

Before

As you can see, it is already sanded.

After


Materials used:

  • Plain wood 220 sander sheet
  • Glidden Premium Collection Paint in Glistening Moonlight in a satin sheen. (This paint has primer, paint and __ all in one).

Tell me what you think of the finished product in the comment box below or ask me any questions!


See you later! ;)  

10.2.12

Under Construction: Bedroom Redecoration...

My room has gotten 3 different decorations and themes throughout these years. When we first moved here, I was crazy in love with Asian stuff (I still am, but more subdued) so the decoration was Asian, with reds and cream, I even had a little lantern and a frame with a porcelain Geisha inside. Then, I got tired of the dark colors, and decided to paint my room a neon pink (to be exact, Tutti Frutti was the color of the paint), don't even ask me what inspired me to paint it that way because I don't even know myself. Approaching my senior year my interests changed to vintage, Victorian, indie, boho things and I wanted something more grown up that would suit my new interests and age. Thus come this new redecoration. First thing I made for my new decoration was a painted reproduction of an ad for Biscuits Brun (the biscuits from Grenoble, France from 1920) on my art class. Here is an image of the original ad (first) and an image of the one I painted (second):

Original Ad
One I painted
I still have a lot to do on my room, I'm far from finished, but I wanted to show you guys the progress so far. First thing I did was get rid of that awful neon pink color; I did that with ivory paint. When I was searching for ideas on the internet I saw a lot of vintage/Victorian wallpapers and I wanted to have some designs on my wall, I didn't wanted it to just be a plain color, so I weight my options. I wasn't going to spend on wallpaper, because first I haven't got the money, second I wasn't going to cover my walls with wallpaper, and third I don't know how to work with wallpaper. So the other option I had was to either have my walls a plain color or either paint them by hand. I'm very persnickety, so of course I choose to paint it by hand, did I know it was going to be a lot of work? not so much. But I wanted to do it. I was going to do it. So, I embarked on a task to paint my walls like a Victorian wallpaper. Since the day I made the decision to today, I have only painted half of 2 walls but, I haven't given up.  Now I know it's hard work, but in the end I know it's going to be worth it. Without further ado, this is how it looks so far:

Close-up of wall designs


I love to read and because of that I have a lot of books. Previously I had a small bookcase of three shelves I got from Home Depot or Wal-mart (I don't remember), and that thing was splintered and weaken with all the weight of my books. I needed a bigger and sturdier bookcase and last year the opportunity arose. As you are all aware of, last year Borders closed its doors (a sad and heartbreaking thing it was) and they were selling everything even the furniture (this is where my new bookcase comes in the story). I ended up buying one 8ft bookcase for $50 and two extra shelves for $6 each. I painted it white and distressed it a bit to give it an antique look. I also made my dad, the handyman in our house, mount it on my wall with some pretty strong screws and wood planks, because I didn't wanted to have to move it to clean the floor and the back of it. That was one of the things that ruined my other bookcase; it splintered from moving it so much. Here is a picture of my new bookcase. I didn't take a before picture, but here is the finished product:

I have a ton of books. I don't know what I would do
when this one fills up. :S
Close-up of the minor distressing I did on the bookcase

I still miss Borders, it was the only place where I bought books here on PR. It was the only library worth visiting. But, at least I still got something to remember it by. :')

Recently they announced that a group of inversionists called Washington Group International bought Borders in Puerto Rico and this year they plan too open three stores, called now Borders Puerto Rico, in Las Catalinas Mall (situated in Caguas), another in Plaza Carolina (situated in Carolina), and the third in The Premium Outlets of Barceloneta. I hope they maintain the same plan of the original Borders. So, I'm excited about that. I'm even keeping an eye out for job applications. :D

P.S. I'm currently painting my night stand. I'll let you guys know when I'm finished! Here is a sneak peek of how it's turning out! ;)


*Details*
Painting colors used:
-Walls: Eloquent Ivory in semi-gloss from Glidden
-Bookcase: Glistening Moonlight in satin from Glidden Premium Collection
-Wall design: 901 Wicker White from Folk Art (regular acrylic paint) [Didn't use the gloss sheen because I wanted the contrast of sheen)

Sandpaper used for prepping wood and distressing: 220-Bare Wood

20.1.12

New Year's YesStyle Haul!


Today, I received my YesStyle purchase! It shipped in 4-5 days. YesStyle.com  is a store that sells Asian clothes, beauty, accessories, jewelry, shoes, and bags for very good prices. They also have a store located in San Francisco, California. Ordering from the online store is completely safe. This is my second purchase from them, and I have nothing negative to say about their service. The products ship very fast and in great conditions. I don't know if everyone receives their packages from DHL, but all the times I have ordered from YS they are the ones to deliver my package. So, there is no problem of the mailer jamming the package in my small mailbox and damaging the products. All their products come inside a white rectangular box and the shoes come in a gray pull-string bag.

YesStyle is currently having their annual sale with up to 80% off (ends on Jan 30, 2012) Only selected items are on sale; there are some pretty good things. The only thing that I find kind of difficult is determining my clothing and shoe size, because it sells Asian clothes the sizes run a little smaller. Well, in my case it's the shoes that run a little small, so far. The first item I purchased from them were a pair of some converse like shoes with cute drawings (mine had piggies on the side), because it was my first time buying shoes online I used my original Converse Chuck Taylor All-stars high-top shoes to determine the size; I'm size 7 US, so according to my Converse shoe box that is size 38 in Europe (the majority of the shoe available come in Europe size). That time I ended up buying the sneaker 38 Europe, but when I got to try it on it fit too exact, I could feel my big toe pressed against the front of the shoe. I didn't end up returning them even though they accept returns because of size, defects, exchange or because you just don't want it. I used the shoes until my feet grow a cm or so, I don't know it just became uncomfortable to wear. Because of that, this time I ended up buying one size bigger (39 Europe) and it was just right. I bought this Nongli deck shoes in pink for $22.40 (they were on sale), they are very comfortable and are not slippery because the outsole is made of rubber. And they are cute too! ;)


Clothing so far, I think is the more difficult in terms of size and fit. They sell a lot of one size clothing, because it doesn't really give us a clue how big a one size is they always have the product measurements in the product information. They also provide material & care information and a couple of photos with details of the product you're buying. One time I bought a bear hoodie sweater on eBay, I think it was also one size. I somewhat measured a sweater I had and I bought it thinking it would fit me. But, when I tried it on there were several things wrong with it: the arms where too short for me and the neck hole was also a bit small. It was kind of a hassle taking off the sweater because it didn't have a zipper and it was pull on. So, this time I bought clothing from Asia I avoided three things: long sleeves, tight tops, and small neck holes. I got this 59 Seconds floral top for $8.80 (also on sale), it was a little bit large for me, but right now I'm liking oversize tops, so it worked for me. Again it wasn't too large, nothing a belt couldn't fix. Just see for yourselves:

No belt!
Again, no belt!

With belt! Sorry for my seriousness, I forgot to smile :)
You can also use this top as a dress!

All in all, I'm very pleased with YesStyle. Happy shopping and also a Happy New Year (better late then never, right!?)

P.S. YesStyle ships worldwide :)

4.12.11

Tutorial: Cute ways to wear a man's shirt


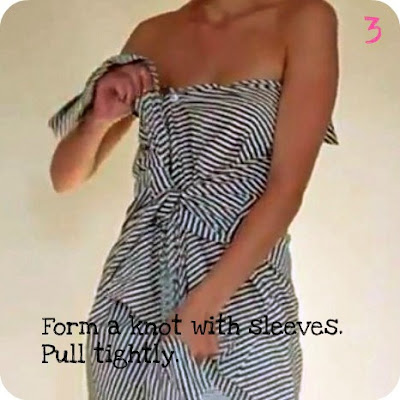
The other day I was watching tutorial videos on YouTube and I saw this video with the title "How a Girl Should Put a Man's Shirt", I clicked on it and was left fascinated. I have always found beautiful how a woman could turn man's clothing into something cute and chic. I want to buy a boy's t-shirt and wear it as a dress, and now that I've seen this I also want to buy a man's shirt to try all this beautiful looks. If I had a boyfriend, of course I would ask him to lend me one of his. ;) Sure there are countless of tutorials for wearing man's shirt but most of them require to cut and sew. Anyway, I thought I would share this with you girls so you can also try this looks. I'm posting the video below, but I also decided to take some screenshots of the steps and final looks in case they delete the video from YouTube, because so many times I have discovered so many amazing videos and when I go searching for them again I find that they have been deleted or the user has erased the account. By taking the screenshots I am in no way taking credit for it; all credit goes to the person who uploaded the video. Here is the video:


And here is the tutorial illustrated in images and briefly explained by me.
Note: the left sleeve should be bent down when you wrap the right one around it.

This is how the back is tied. 


As soon as I learn how she tied the bow I'll update. :)

29.11.11

Tutorial: Lucky Wishing Stars!


This cute little baby stars are super easy to make and they make great decoration.  It's a great way to recycle used paper. I find that magazine paper is more sturdy than regular white paper. Stars made out of magazine paper end up being more colorful than a regular one plain colored paper. They look more interesting made with written paper or like I said magazine paper. It's very important that the paper you use is not to tough because it might break when you pull it to form the star. So, without further ado here is the tutorial part: 

What you need:
1. Strip of paper: 1.5cm X 23cm
2. Ruler
3. Scissors

Directions:

And that's it. Easy right! At first it may be a little difficult to achieve a proportioned star. I had to do it like 3 times before I could get it right. Practice makes perfect. After you make one, you will want to be making more and more. They are fun too make. You can make them any size you want, just play with it. If you want a bigger star, the strip needs to be wider and longer. You can write a wish on each star and place them in a jar. It makes a cute decoration item for your room. Simple and cute. Here is a picture of my wishing jar:


I even made a ribbon star (the white star on the left), it's basically the same steps the only difference is that you need to sew (pulling inwards) between the points of the pentagon so that it forms a star, otherwise it will be a pentagon. You can also fill it a little bit with plush fluff before you tuck the end into the inside flap (step 7). And I also sew all around the star so it will maintain it's shape. For this star I used a white satin ribbon I had laying around.
 
Blog Template by Delicious Design Studio