15.9.12

Tutorial: Hair fabric scrunchies


This year I have set myself a goal to grow waist-long hair. I'm doing everything to prevent my hair from breaking so it will grow fast. I've been reading and looking for tips to take care of my hair and one of the things I found was that elastic hair ties can break your hair when you take them out. And that were the only hair ties I had. So, I went to 2 or 3 stores looking for soft fabric scrunchies (this are the best ones to prevent hair from breaking) and I either found them too expensive or ugly. So, I looked for tutorials on the internet and found various ones. And I made one. Here is how.

Materials:

  • 2 strips of fabric 56cm x 5cm
  • 1 elastic 22cm long
  • Sewing machine
  • Pins
  • Fabric scissor
Directions:
  1. Measure and cut two strip of fabric (56cm x 5cm)
  2. Place the right sides together and sew one side. Pin it so it won't move when sewing.
  3. Now that one side is sewn, fold the two end seams in about 1cm and pin them.
  4. Place the right sides together again and sew the other side.
  5. Turn the tube, right side out. Careful, you don't want to break the stitches. Just take your time. 
  6. Take the elastic, pin it on one end and pass it inside the tube to the other end.
  7. Take the two ends of the elastic and make a knot. Make sure you make it very tight, you don't want the elastic to loosen when your using the scrunchy. 
  8. Close the tube by placing one end inside the other end and stitching.
  9. All done, now you have your very own handmade scrunchy.
Now, you can make a bunch of scrunchies to fit your mood or your clothes. You can make them out of any fabric you have, even an old sweater just be sure it doesn't measures less than 56cm x 5cm. And best of all you can make them with whatever fabric you like without having to spend to much money. If you have thin or straight hair don't use silky fabrics because the scrunchy will fall right off. Hope this inspires you to make your own scrunchies. :)


Have questions? Submit them on the comment box!

3.9.12

Handmade: Doctor Who Tardis

It's been a very looong time since I last posted something here. I'm still alive and well. I'm spend more time on Tumblr and now that I've started university (yes, I finally started :D) life's kinda hectic. But, I'm finally posting something for you guys and it's another of my creations. Heh! Enjoy, my boring and long explanation.

I've recently entered into the fandom world of Sherlock and Doctor Who and I absolutely love them. I'm more obsessed with Sherlock since I already finished the series (well, until 2013). With Doctor Who I like it so far, I'm only finishing the first season with the ninth doctor so I haven't seen much I still have a lot more episodes ahead.

Every time I finish a series or drama I always want to make something handmade to remind me of it. When I finished Sherlock I went searching for something to recreate, but sadly I still haven't found something I absolutely wanted. Because what I really wanted was a plush of Sherlock and Watson, but I'm very bad at making plushies, maybe sometime in the future I'll get better at it.

Anyway, moving forward...

Last night I got the idea to recreate the Doctor Who tardis. And tadda!, it turned out better than I expected it.


*The lantern glows very faintly. I wanted to capture it in a photo but the light is so faint that it wasn't visible. So, I just placed it beneath a desk lantern to create the effect of glowing.

"How I made it": 
    I used materials I had already in my home, I didn't go out to buy anything. The main material is the mini Popsicle sticks that is basically what the box is made of. I measured and cut the round edge of the Popsicle sticks. I ended up getting air bubbles in my fingers because I used a wire cutter for this, yeah I know it was stupid of me, but I didn't have a wood cutter or something similar. For support, inside of the box, I used the cardboard that comes inside a toilet paper roll. Cut it in rectangular strips and glue them to the walls. I used contact cement to glue it all, but I think it's best if you use wood glue. To avoid the gap between each Popsicle stick from being visible, using liquid gesso, I glued a sheet of toilet paper on top of each wall, floor and ceiling. To do this, just paint a layer of liquid gesso on the Popsicle wall and while it's still wet stick the toilet paper sheet on top (carefully to avoid wrinkles) and on top of the toilet paper paint another layer of liquid gesso. For the lantern on top, I found a little tube that comes with nail art paintbrushes, those very fine paintbrushes to paint works of art on nails, well those specific kind of brushes come with a small plastic cylinder that is used to protect the brush to avoid it from getting damaged. I cut it to the height I wanted it. Using polymer clay, I made the bottom and the top of the lantern. For inside the lantern, I had that plastic string, that girls use to make bracelets, in glow-in-the-dark. I cut it in little itty bitty pieces and filled the plastic cylinder with it. For the coil around the cylinder, I just cut and twisted a bobby pin. And the paint, I used regular acrylic paint that you can find in any craft store. All the details are hand painted. 


I always think about doing a full tutorial before I'm going to make something handmade, but (1) I end up forgetting or I remember when I'm already through the middle of the process, (2) I think, what if it doesn't turn out like you expect it or it's a complete failure? or (3) It's more time consuming taking photos while working. So, in conclusion I never end up doing a tutorial but someday I hope I can make one for you guys. Be it a video or s step-by-step photo tutorial. 

That is all for this post. Hope you guys enjoyed it and got inspired to create something with materials found around the house. 

Share with me: Do you also like to own or make something to remind you of that special series, drama, book, movie or video game you love so much? If so, what is it and what series, drama, book... is it from?

Adiós y Buenas Noches! (Bye and Goodnight!)

Follow me on Tumblr: http://lissomeflower.tumblr.com/

23.3.12

I miss...

I miss the excitement of reading a new book. Opening a new book and hearing the sound of the pages turning. The smell of a new book. Being sucked into a new world. Wasting hours just reading. The feel of the pages against my fingers. Crying and laughing with the characters of the story. Learning magic, survival skills, and exploring new places. Yelling and getting anxious in the right parts. Meeting new friends. Having the most wondrous of adventures. I miss buying a whole stack of books and being anxious to read them all. Staying up late into the night just because I can’t bring myself to close the book. I just miss holding a book with a new adventure waiting for me inside.

The Hunger Games!

I had read The Hunger Games trilogy long before they announced they where making it into a movie, so of course I was super excited when I found out a movie adaptation was on the way. Whenever they adapt movies from books me and my sister have read (we are book geeks), we go and see the movie the same day it premieres. In our case, Thursdays. One of the plus Puerto Rico has is that movie premieres are on Thursdays instead of Friday. But the only downfall is that some movies that are not highly anticipated don't come to PR or it comes out 2 or 3 weeks after. Yesterday was finally the day we would be able to see one of our favorite books come to life. We bought the tickets the day before, just because we have had experiences were they are sold out the same day. I went with my Katniss braid, because I wanted to have something that represented the movie or books in a way.

My outfit for that day and of course my Katniss braid.

When we got to the cinema I expected it to be a line waiting to go inside, but I found nothing compared to that. In reality, there was no line to go in. There where only a group of little kids in line to see The Lorax. But, no Hunger Games fans in site. Oh well! *sigh* :( We took our seats in the nearly empty cinema room. Gladly a group of fans sat behind us. Yay! One of the girls had also the Katniss braid and others had the mocking jay pin. Finally some awesome peeps! The movie started at 1:55pm, but because of all the commercials and trailers it ended up starting at about 2:30pm. I was beginning to get anxious. The lights dimmed and it was showtime. The music started playing and all emotions exploded. I couldn't contain myself; I wanted to cry, I wanted to scream and I wanted to jump out of my seat in excitement for what awaited me.

The movie was beyond my expectations. It was really a true adaptation of the book, even thought the director did some changes and omitted others it wasn't anything mayor or super important. First of all, Josh was so perfect, he absolutely did an amazing job portraying Peeta. He captivated my heart in some ways I didn't thought it was possible. Jennifer was the perfect  Katniss, he was the kick-ass girl I would love to see more on movies, the non-girly type, the girl who fights to defend her loved ones no matter the cost. I also love her off screen, she's so random and giddy. Lenny was marvelous as Cinna, he made the character more lovable than he already was and that gold eye shadow, spectacular. Woody was also very good as Haymitch. Elizabeth made Effie shine; her voice and her acting was just so perfect. And her clothes, out of this world. Stanley the perfect Caesar. We's accent and that Seneca's beard was so spectacular. I mean, that beard has it's own Facebook page. It was incredible. All in all the cast was perfect. Except I would have chosen somebody else for the role of Gale, but oh well he doesn't appear that much.

(Spoilers beyond this point!)

11.3.12

Tutorial: Easy Peanut Butter Cups with a Twist


Whenever I get an urge to eat a peanut butter cup I get my melting chocolate and my crunchy peanut butter out and prepare it. It is super easy to make peanut butter cups in your home. It takes less than 15min. And the ingredients are easy to find. This time, when I made them I kept picturing cinnamon and chocolate together. So, I added a tiny bit of cinnamon on each cup. It tasted actually pretty good.

I suck taking photos!
The original peanut butter cups has the peanut butter wrapped in chocolate, but in my version I prefer to have the peanut butter and chocolate mixed together. I like to mix it in because it's less time consuming and I like the even distribution of the ingredients and you taste them both in each bite.

Because I didn't have enough milk chocolate I had to complete it with white chocolate. There isn't really that much of a difference of taste between the two, but a lot of people prefer milk chocolate over the white (including me). So you tell me, which chocolate is your favorite, milk or white?

Originally they are more milk chocolate colored but because of the white chocolate
they came out more peanut buttery colored.


Cinnamon Peanut Butter Cups


Ingredients: 

  • Melting chocolate (milk, white or whichever you prefer)
  • Crunchy peanut butter (I used Skippy)
  • Ground cinnamon
  • Cupcake pan
  • Cupcake liners
  • Spoons
  • Microwave safe bowl
Directions:
  1. Start by melting the chocolate in microwave safe bowl in 10sec intervals. Mix between each 10sec to ensure proper melting.
  2. After you have all your chocolate melted, take big spoonfuls of peanut butter and mix it in the chocolate. I usually mix in a little less peanut butter than chocolate. Mix it until you see the peanuts evenly distributed.
  3. Take your cupcake liners and insert them in your cupcake pan. Pour onto each cupcake liner. You can fill them to the top and have a very big peanut butter or just coat the bottom of the liner to make a  thin peanut butter cup. I usually just coat the bottom, I have never filled it to the top. But, me my guest and fill it and see how it turns out; I mean it's chocolate eventually its going to harden and it's not going to taste any different.
  4. Move the pan around so the mixture levels. 
  5. Sprinkle a little bit of cinnamon onto each cup. You can always mix it into the mixture before pouring into the liners. 
  6. Place on fridge and wait until it hardens. 
  7. Enjoy!

Tell me your thoughts I want to hear them. Would you add more cinnamon or do you prefer it without the cinnamon? Would you try and make them? Any questions? Ask me on the comments and I will try and help.

Until next time!

17.2.12

Tutorial: Painted Vintage Wallpaper


This tutorial is for creating a wallpaper look on your walls or anywhere you like. I decided to make a tutorial about how I'm painting my walls in case any of you guys are interested or even as crazy as me to take on this time consuming task.


1. The first thing you need to do is have your design, either look for it on the internet or draw it. In my case, I searched for it on the internet. There are many intricate designs available, so if you look for it online make sure the image is good quality so you can see the little designs clearly. Here is the one I chose:

2. Now that you have the image of your design, print it. Make sure to print it big enough so you can easily cut the little designs. But also take in account how big you want your stencil.
3. When you cut of the excess paper, make sure to leave a square around the design. We are going to use that as a guide when stenciling. I left 1cm on the top and bottom, and 1.3cm on each side.

4. After you have cut it, you should be left with a 11.4cm x 11.6cm square stencil.

5. Now take an exact-o-knife or a very thin scissor and cut out the design. Now decide if you want a stamp stencil or a tracing stencil. 
6. Constructing your stencil:
  • For the stamp stencil: After you have your pieces cut, take a foamy sheet and trace the designs. Cut them. Take a thick piece of cardboard or a thin piece of wood (11.6cm x 11.4cm) and using your stencil square (now holey) trace the designs with a pencil. You need to do this as a guide to glue the foamy pieces. Now glue the foamy pieces on top of the pencil lines. Make sure to use a very good glue (I used Elmer's Contact Cement) Let dry. F.Y.I. You need to trace and glue them upside down so when you stamp it, it comes out straight. 
  • For the tracing stencil: Print the design on a cardboard paper and cut out the pieces. Now you have a holey stencil. To protect the stencil I wrapped it in contact paper and cut the the contact paper out of the holes. There you have it.


7. Using your stencils: 
  • Stamp Stencil: Cover the foamy part with paint and stamp away. Make sure not to put the coat of paint too thin or too thick. If it's too thin the design won't come out complete and the paint will dry before you stamp it. If you put it on too thick when you press it, the paint will spread everywhere and you will have a blotch design rather than a clean look.
  • Tracing Stencils: Place it on the surface you will paint and with a pencil (I don't recommend using a pen because if your using a light color paint the pen will show through) trace each design. Take off the stencil and with a thin paintbrush paint each design, one by one. This is the most time consuming of the stencils. I know that you can also paint it with the stencil on, but I don't highly recommend it if you have cement walls, because the walls are not smooth enough and the paint may seep under the stencil. If you have very smooth walls I think it should be fine, just don't pile too much paint on it, or otherwise you'll get a 3D effect.
8. Making the wallpaper: I started with the top right corner of my wall. The first and second design are the most crucial, because they will serve as your guide. You can either start with a complete design or a half-design as I did. (To make the corners, top and bottoms: when printing your design, print more than one. Measure it as explained in the steps above; the only difference is that you cut it in half.) Align your stencil with your ceiling and bring it as near as you can to your opposite wall corner. As soon as your sure the stencil it's in its right position, stamp or draw it. You want to make your design below the first, leave a thumb-sized space between the designs and stamp or draw your second design, making also sure that is as close as possible to the opposite wall corner.


9. Now that you have at least the two crucial designs you are going to make your third design. Align the left edges of your stencil with the right side dots of both your first and second designs. and draw your third design. This is the reason why you need the stencil to be square. In some cases the distance between each design will be a little more spaced out and the edges of your stencil won't fully be align with the dots, if this happens just try to place the stencil in the middle of the two dots. 


10. And that's it, just keep using your stencil edges and the outer dots as a guide. When you finish you will have a beautiful wallpaper design on your wall.


At first, I was using the tracing stencil, but it just took to much time, so now I switch to the stamp stencil. The only difference between the both is that the tracing stencil makes a more clean and beautiful design, whereas the stamp stencil, they don't come out as beautiful and complete as the other one.

If you have any questions, write them on the comment box and I'll help you as much as I can. If you take on the challenge send me a picture of how it turned out.

Update: I still haven't finish painting my entire room. I have like half a wall done. Hope I'll be able to finish it faster with the stamp method.

Update: Room Redecoration

Hi, everyone! I recently finished painting my bed side table. I did the same things as the bookcase. First, I sanded it down, to remove the varnish. Second, I gave it 3 coats of paint, waited for it to dry very well and gave it a quick sand to get a smooth surface. Finally, I sanded the areas I wanted it to look distressed, in this case, the edges and on top of the intricate designs. I did all this in one day. I had already painted the drawers the day before, but I think it's possible to paint it one day. Because the paint I used (details below) dries very fast. Here is the before and after picture:

Before

As you can see, it is already sanded.

After


Materials used:

  • Plain wood 220 sander sheet
  • Glidden Premium Collection Paint in Glistening Moonlight in a satin sheen. (This paint has primer, paint and __ all in one).

Tell me what you think of the finished product in the comment box below or ask me any questions!


See you later! ;)  

10.2.12

Under Construction: Bedroom Redecoration...

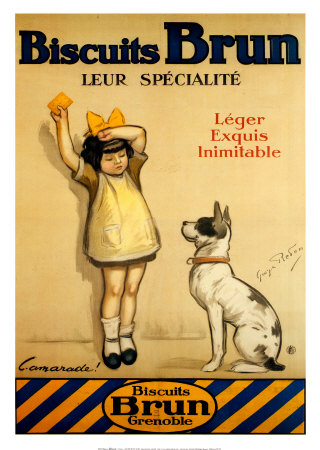
My room has gotten 3 different decorations and themes throughout these years. When we first moved here, I was crazy in love with Asian stuff (I still am, but more subdued) so the decoration was Asian, with reds and cream, I even had a little lantern and a frame with a porcelain Geisha inside. Then, I got tired of the dark colors, and decided to paint my room a neon pink (to be exact, Tutti Frutti was the color of the paint), don't even ask me what inspired me to paint it that way because I don't even know myself. Approaching my senior year my interests changed to vintage, Victorian, indie, boho things and I wanted something more grown up that would suit my new interests and age. Thus come this new redecoration. First thing I made for my new decoration was a painted reproduction of an ad for Biscuits Brun (the biscuits from Grenoble, France from 1920) on my art class. Here is an image of the original ad (first) and an image of the one I painted (second):
Original Ad
One I painted
I still have a lot to do on my room, I'm far from finished, but I wanted to show you guys the progress so far. First thing I did was get rid of that awful neon pink color; I did that with ivory paint. When I was searching for ideas on the internet I saw a lot of vintage/Victorian wallpapers and I wanted to have some designs on my wall, I didn't wanted it to just be a plain color, so I weight my options. I wasn't going to spend on wallpaper, because first I haven't got the money, second I wasn't going to cover my walls with wallpaper, and third I don't know how to work with wallpaper. So the other option I had was to either have my walls a plain color or either paint them by hand. I'm very persnickety, so of course I choose to paint it by hand, did I know it was going to be a lot of work? not so much. But I wanted to do it. I was going to do it. So, I embarked on a task to paint my walls like a Victorian wallpaper. Since the day I made the decision to today, I have only painted half of 2 walls but, I haven't given up.  Now I know it's hard work, but in the end I know it's going to be worth it. Without further ado, this is how it looks so far:

Close-up of wall designs


I love to read and because of that I have a lot of books. Previously I had a small bookcase of three shelves I got from Home Depot or Wal-mart (I don't remember), and that thing was splintered and weaken with all the weight of my books. I needed a bigger and sturdier bookcase and last year the opportunity arose. As you are all aware of, last year Borders closed its doors (a sad and heartbreaking thing it was) and they were selling everything even the furniture (this is where my new bookcase comes in the story). I ended up buying one 8ft bookcase for $50 and two extra shelves for $6 each. I painted it white and distressed it a bit to give it an antique look. I also made my dad, the handyman in our house, mount it on my wall with some pretty strong screws and wood planks, because I didn't wanted to have to move it to clean the floor and the back of it. That was one of the things that ruined my other bookcase; it splintered from moving it so much. Here is a picture of my new bookcase. I didn't take a before picture, but here is the finished product:

I have a ton of books. I don't know what I would do
when this one fills up. :S
Close-up of the minor distressing I did on the bookcase

I still miss Borders, it was the only place where I bought books here on PR. It was the only library worth visiting. But, at least I still got something to remember it by. :')

Recently they announced that a group of inversionists called Washington Group International bought Borders in Puerto Rico and this year they plan too open three stores, called now Borders Puerto Rico, in Las Catalinas Mall (situated in Caguas), another in Plaza Carolina (situated in Carolina), and the third in The Premium Outlets of Barceloneta. I hope they maintain the same plan of the original Borders. So, I'm excited about that. I'm even keeping an eye out for job applications. :D

P.S. I'm currently painting my night stand. I'll let you guys know when I'm finished! Here is a sneak peek of how it's turning out! ;)


*Details*
Painting colors used:
-Walls: Eloquent Ivory in semi-gloss from Glidden
-Bookcase: Glistening Moonlight in satin from Glidden Premium Collection
-Wall design: 901 Wicker White from Folk Art (regular acrylic paint) [Didn't use the gloss sheen because I wanted the contrast of sheen)

Sandpaper used for prepping wood and distressing: 220-Bare Wood

20.1.12

New Year's YesStyle Haul!


Today, I received my YesStyle purchase! It shipped in 4-5 days. YesStyle.com  is a store that sells Asian clothes, beauty, accessories, jewelry, shoes, and bags for very good prices. They also have a store located in San Francisco, California. Ordering from the online store is completely safe. This is my second purchase from them, and I have nothing negative to say about their service. The products ship very fast and in great conditions. I don't know if everyone receives their packages from DHL, but all the times I have ordered from YS they are the ones to deliver my package. So, there is no problem of the mailer jamming the package in my small mailbox and damaging the products. All their products come inside a white rectangular box and the shoes come in a gray pull-string bag.

YesStyle is currently having their annual sale with up to 80% off (ends on Jan 30, 2012) Only selected items are on sale; there are some pretty good things. The only thing that I find kind of difficult is determining my clothing and shoe size, because it sells Asian clothes the sizes run a little smaller. Well, in my case it's the shoes that run a little small, so far. The first item I purchased from them were a pair of some converse like shoes with cute drawings (mine had piggies on the side), because it was my first time buying shoes online I used my original Converse Chuck Taylor All-stars high-top shoes to determine the size; I'm size 7 US, so according to my Converse shoe box that is size 38 in Europe (the majority of the shoe available come in Europe size). That time I ended up buying the sneaker 38 Europe, but when I got to try it on it fit too exact, I could feel my big toe pressed against the front of the shoe. I didn't end up returning them even though they accept returns because of size, defects, exchange or because you just don't want it. I used the shoes until my feet grow a cm or so, I don't know it just became uncomfortable to wear. Because of that, this time I ended up buying one size bigger (39 Europe) and it was just right. I bought this Nongli deck shoes in pink for $22.40 (they were on sale), they are very comfortable and are not slippery because the outsole is made of rubber. And they are cute too! ;)


Clothing so far, I think is the more difficult in terms of size and fit. They sell a lot of one size clothing, because it doesn't really give us a clue how big a one size is they always have the product measurements in the product information. They also provide material & care information and a couple of photos with details of the product you're buying. One time I bought a bear hoodie sweater on eBay, I think it was also one size. I somewhat measured a sweater I had and I bought it thinking it would fit me. But, when I tried it on there were several things wrong with it: the arms where too short for me and the neck hole was also a bit small. It was kind of a hassle taking off the sweater because it didn't have a zipper and it was pull on. So, this time I bought clothing from Asia I avoided three things: long sleeves, tight tops, and small neck holes. I got this 59 Seconds floral top for $8.80 (also on sale), it was a little bit large for me, but right now I'm liking oversize tops, so it worked for me. Again it wasn't too large, nothing a belt couldn't fix. Just see for yourselves:

No belt!
Again, no belt!

With belt! Sorry for my seriousness, I forgot to smile :)
You can also use this top as a dress!

All in all, I'm very pleased with YesStyle. Happy shopping and also a Happy New Year (better late then never, right!?)

P.S. YesStyle ships worldwide :)
 
Blog Template by Delicious Design Studio